
Changes to the D2L Assignment Experience
D2L has made some changes to the was assignments work in Brightspace, particularly to how assignments are created and evaluated. These are respectively “The New Assignment Creation Experience” and the “The New Assignment Evaluation Experience”. Both of these new experiences are intended to streamline how we create and grade assignments by making sure that most of the things we have to do are now all found in the same place, rather than having to click through multiple tabs.
D2L is in the process of developing new experiences for several tools including discussions and content which will become available over the next year or so.
These experiences have been available as “Opt-in” for a while now, meaning that Brightspace will offer you the option to use them, but you can also switch back to the old experiences. Now the new experience will become the standard interface for grading assignments and in December, the new experience will become the standard interface for creating assignments
This post provides a brief introduction to both new experiences and will hopefully help you navigate between the old and new ways of managing assignments in your courses.
The New Assignment Creation (and Editing) Experience
The New Assignment Creation Experience is intended to move many of the things you had to find on separate tabs into one unified page with the main workflow of setting up an assignment on the left and the other configurations you may want to change for an assignment in a smaller segment to the right.
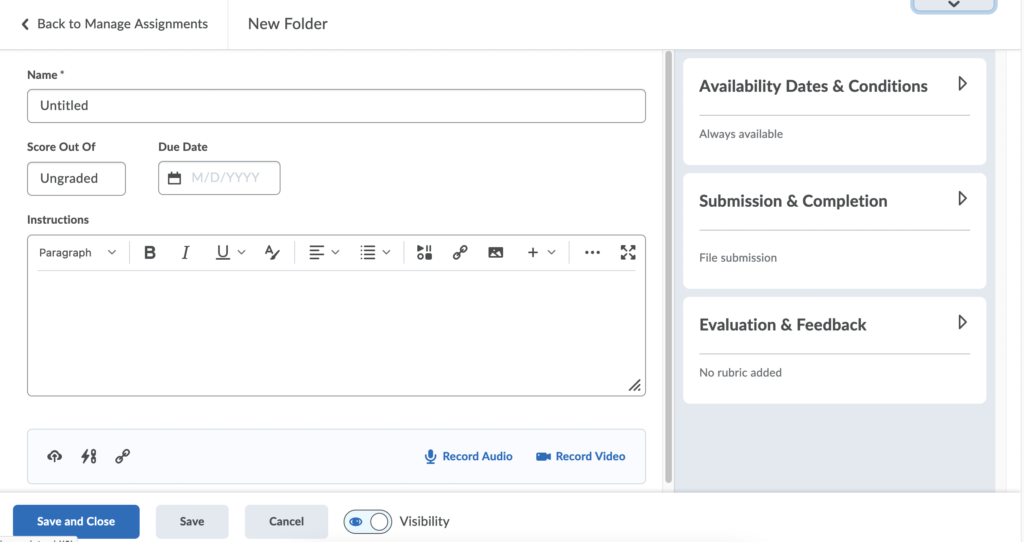
In the main left segment, there are all the areas you will have to fill in when creating an assignment, more or less matching the first page when creating an assignment with the previous experience. At the top there is a space for a title, below that the grade and due date and below that space to describe your assignment and attach any necessary files.
On the right, there are three segments, Availability and Conditions, Submission and Completion and Evaluation and Feedback.
- Under Availability and Conditions, you can control when students see the assignment, either using dates for it to be available and then unavailable, or using release conditions so that the assignment only becomes available when the student meets some condition in the course. You can also set special access to accommodate students who may need a different condition for the assignment.
- Under Submission and Completion, you can set up the assignment as an individual or group assignment and control how students are able to submit. Submission options include the standard file submissions, but also you can create assignments for work that cannot be submitted to D2L (such as an in-class presentation), but for which you might want to provide feedback. You can also put the assignment in a category to help with course organization.
- Under Evaluation and Feedback, you can attach rubrics to the assignment, either using already created rubrics in the course or creating new ones on the fly.
Changes When Creating an Assignment
The most notable change when looking at the assignment creation experience is that things have moved. This was done to reduce the overall amount of scrolling needed and having to switch between tabs. This will hopefully make creating assignments easier and faster, although it is a change, and you may want to give yourself a little extra time the first few times you create an assignment.
The way you attach or assign grades to an assignment is the biggest workflow difference compared to the previous creation experience. In the new experience a new assignment appears as “Ungraded” when you click on that field, you can then enter the number of points the assignment is out of and select which grade item in the gradebook you would like to attach the assignment to. You can also choose “Not in Grades” if you want to assign a score, but not have the assignment attached to the gradebook, or “Reset to ungraded” if you don’t intend to assign grades to the assignment.
When choosing “In Grades” a new grade item will automatically be created in the gradebook with the same name as the assignment. Clicking on “In Grades” lets you choose from an existing grade item in the gradebook or providing your own name for the new grade item. The weight of the grade item isn’t adjustable from assignment creation, and you will have to go to the gradebook to adjust the weight. (It may be easier in the long run to create all items in the grade book first and then attach assignments to them as you are ready.
Categories were moved out of the creation experience and into the assignment/dropbox bulk editor, however as of late July, they have been returned to assignment creation.
The New (Consistent) Assignment Evaluation Experience
As with creating assignments, the new way to evaluate assignments is intended to make giving students feedback faster with fewer clicks and new windows (particularly if you’re using rubrics).

The new evaluation experience is very similar in appearance to the previous experience with a large panel on the left with the student’s submission visible (unless it’s a type of file Brightspace can’t display) and a feedback panel on the left. Information about the student has been moved out of the feedback panel and up to the top, where it now includes a quick box from which you can look at all of the submissions and the files submitted. The feedback window has also been streamlined with the assignment description removed, but you can go to the assignment description or to special access from the menu there.
Changes When Evaluating an Assignment
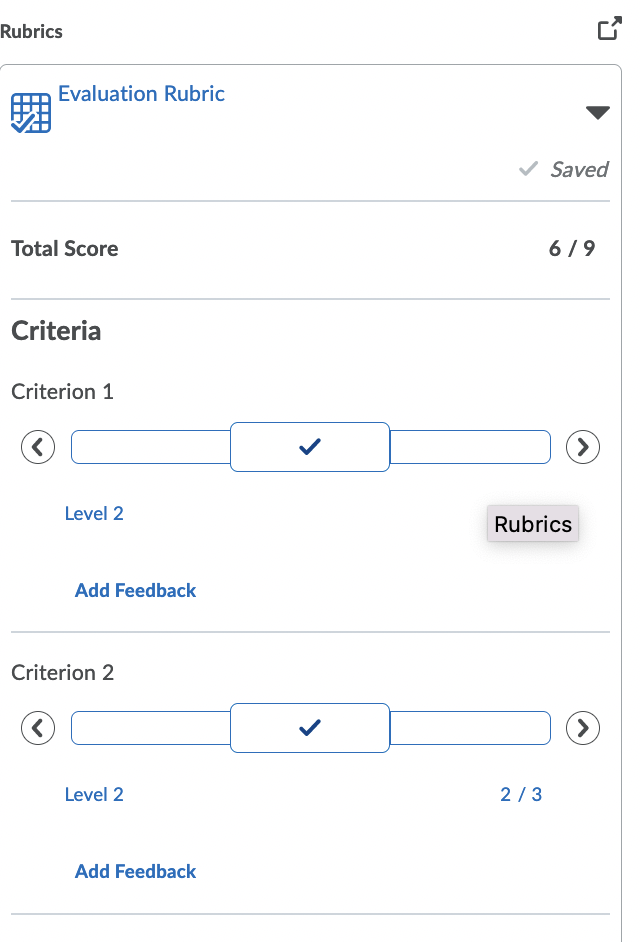
The biggest change you will notice is that now when grading with a rubric, the rubric is shown in the feedback area. In the previous experience when you were grading with a rubric, the rubric opened in a new window, and you were able to select the appropriate level for each criterion. Now, in the new experience the rubric will appear in the panel on the right along with overall grade and the feedback area. For each criterion you can select the level by clicking or dragging a slider across the criterion. For each level as you hover over the details are displayed. This allows the rubric display to be more compact and for the rubric to automatically update the student’s grade for the assessment.
When looking at a student’s submission you can now see all of their submissions together in one place with the submission list or the selector by the students name at the top.
If the assignment is a group assignment, then the group information will be displayed in the top and you will be able to see all the group members or contact them by clicking on the group name.
Things to Keep in Mind
The evaluation experience has now become permanent. The same will happen to the creation experience in late December. You can let us know if the new experiences are working for you and if anything in your work has become easier or harder with the change. We’re always looking to support instructors as best we can with the tools available.
